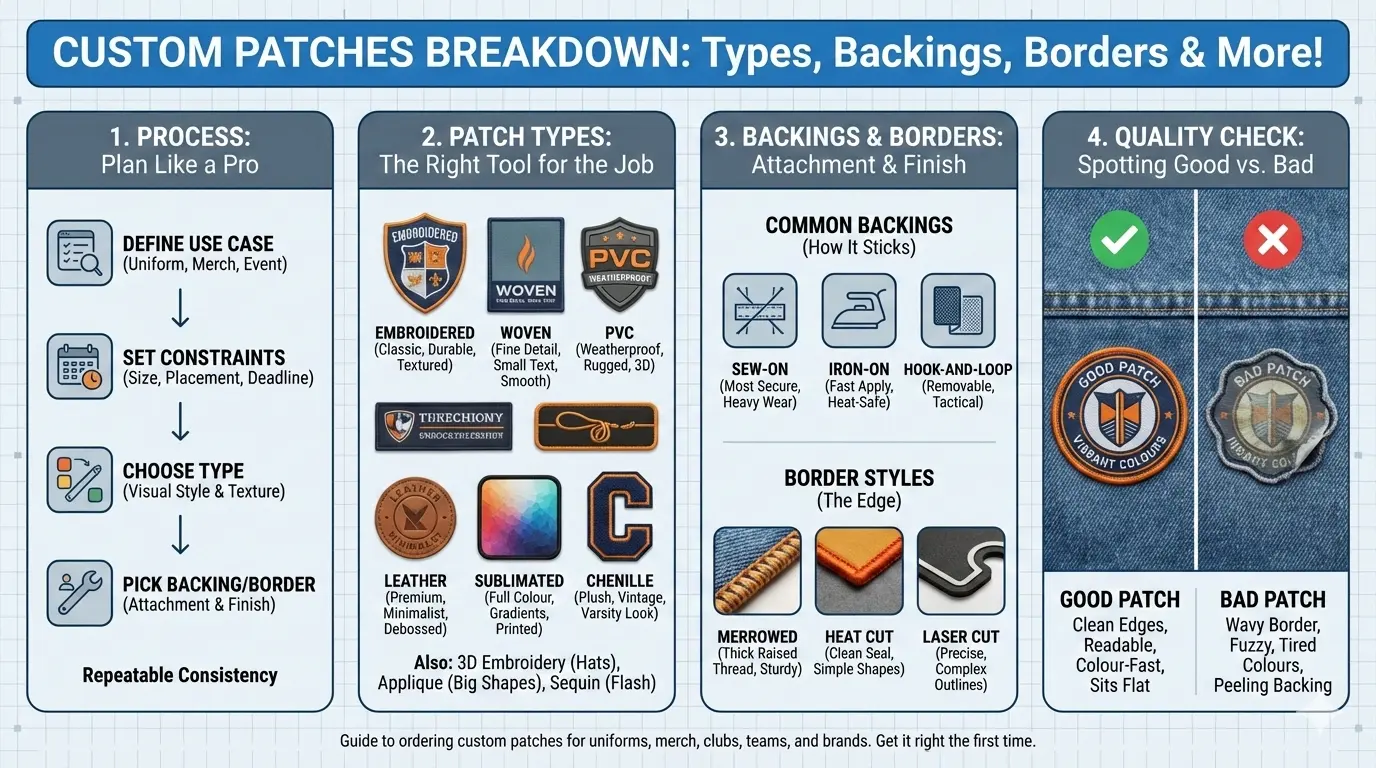
You can spot a good patch from ten feet away. The edges are clean. The colours don’t look tired. The lettering is readable. And it sits on the garment like it was always supposed to be there.
You can also spot a bad one fast. The border waves. The backing peels. The thread looks fuzzy after a couple washes. Suddenly your “small detail” becomes the thing everyone notices.
This guide is the long, practical version. If you’re ordering custom patches for uniforms, merch, clubs, teams, brands, events, or a one-off idea you want to test, this is how to plan it like a grown-up, not like a “hope it turns out fine” gamble.
What You’re Really Buying When You Order Custom Made Patches
A patch is a tiny manufacturing project:
- A design problem (can this artwork translate into thread, weave, print, or molded material?)
- A material choice (what matches your use case: jackets, hats, backpacks, workwear, tactical gear?)
- An attachment decision (how it gets on the product and how long it needs to stay there)
- A quality control decision (what “acceptable” looks like before it ships)
When you order custom made patches, you’re buying repeatable consistency. That matters when you’re doing staff uniforms across locations, a merch run you’ll restock monthly, or a club that needs the same look season after season.
Real-world tip:
If your logo is detailed, don’t fight embroidery. Either simplify the design or switch to woven or sublimated. Trying to force tiny text into embroidery is how you end up with a patch that looks “mushy” in real life.
Where Patches Get Used Most (So You Don’t Choose the Wrong Type)
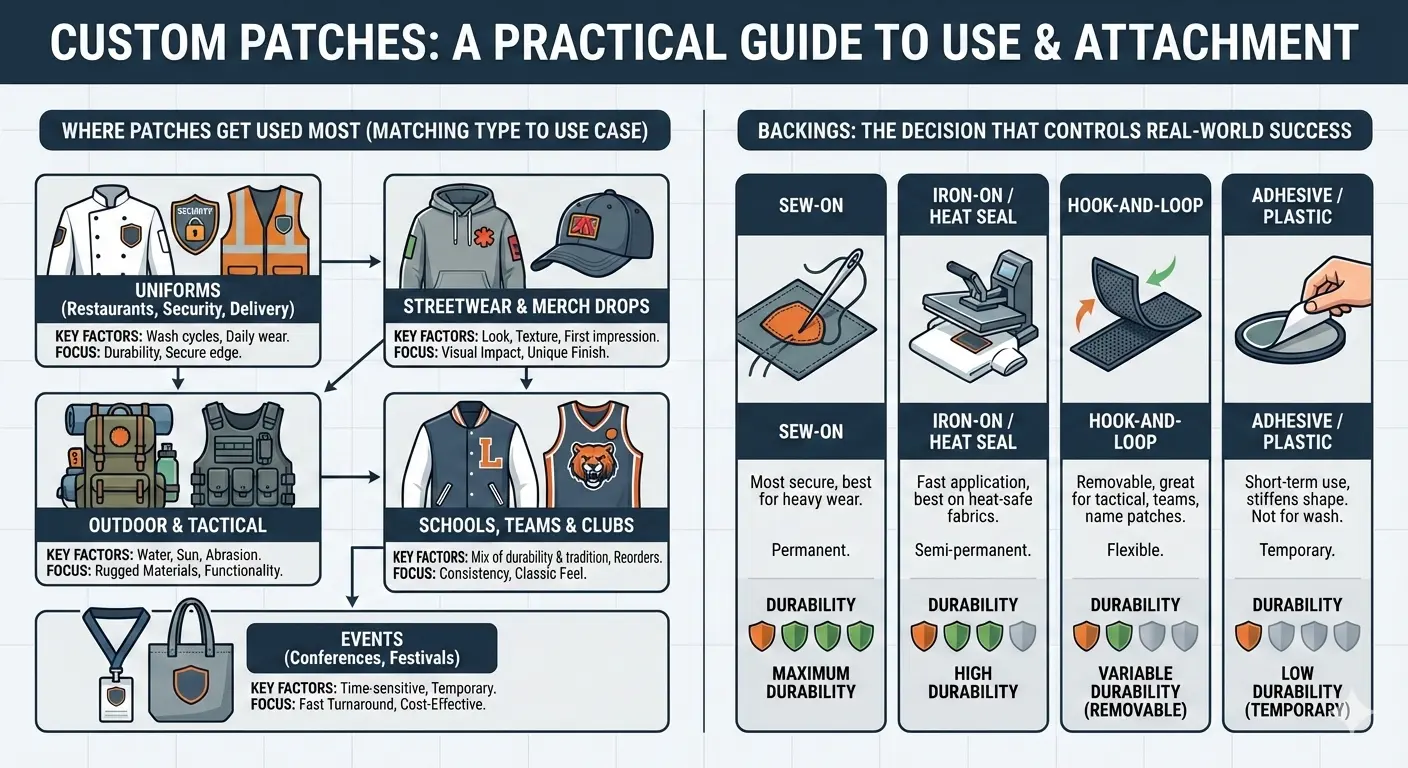
Different use cases punish different patch types.
- Uniforms (restaurants, security, construction, delivery teams): Wash cycles and daily wear. Backing and edge finish matter.
- Streetwear and merch drops: Look and texture matter. People judge with their eyes first.
- Outdoor and tactical: Water, sun, abrasion. Materials matter more than “fancy details.”
- Schools, teams, and clubs: Mix of durability and tradition. Often lots of small reorders.
- Events: Time matters more than perfection. You want “clean and fast,” not “museum-level.”
If you start with the use case, the patch choice gets way easier.
The Patch Manufacturer Mindset: Start With Constraints
If you’re working with a patch manufacturer, give them constraints first. Not a long story. Constraints.
- Where it’s going: hat front, sleeve, chest, backpack, jacket back, Velcro panel
- Size target: “around 3 inches wide” is useful
- How it attaches: sew, heat, hook-and-loop, adhesive
- Quantity: sample run vs 500 vs 5,000
- Deadline: actual date it must be in-hand
Those five details prevent the most common disasters: wrong size, wrong backing, wrong material, wrong timeline, wrong price expectations.
Artwork That Works: What To Send (And What Not To)
You do not need perfect files to start. You do need clarity.
Best files to send
- Vector files: AI, EPS, PDF (vector), SVG
- High-res PNG with transparent background
- A clean logo lockup pulled from a brand kit
Files that cause trouble
- Screenshots
- Tiny JPGs ripped from Instagram
- “Here’s a photo of our truck door logo” (still workable, just slower)}
If your logo has tiny text, thin lines, or gradients, say that upfront. It changes the recommendation fast.
Patch Sizing: Stop Guessing and Measure Your Placement
Most returns and complaints happen because someone imagined the size instead of measuring it.
Do this:
- Grab the garment or hat
- Mark the placement area with painter’s tape
- Measure width and height of the space you actually have
Then decide your patch size based on that real space.
Quick reality checks:
- Hat front: most designs live around 2.25 to 3.5 inches wide
- Sleeve: 2.5 to 4 inches depending on garment
- Chest: 3 to 4.5 inches is common for logos
- Back patch: can go big, but stitching time and cost jump fast
Bigger is not always better. Bigger often just makes flaws easier to see.
Borders and Edges: Merrow, Heat Cut, Laser Cut (Pick the Right One)
The edge finish impacts both look and durability.
Merrowed border
Classic raised thread border. Great for sturdy shapes. Not great for tiny detail or sharp corners.
Heat cut border
Clean edge, good for detailed shapes and text. It’s common for woven and some embroidered styles.
Laser cut
Used when you want precise shapes and a modern finish. Great for complex outlines.
If your design has sharp points, skinny shapes, or small interior holes, don’t force a thick merrow border. It’ll fight you.
Backings: The Decision That Actually Controls Real-World Success
Design sells the patch. Backing decides whether it survives.
Common backing options:
- Sew-on: most secure, best for heavy wear
- Iron-on / heat seal: fast application, best on heat-safe fabrics
- Hook-and-loop: removable, great for tactical, teams, name patches
- Adhesive / peel-and-stick: short-term use, not for wash-heavy garments
- Plastic backing: adds stiffness, helps patches hold shape
If you’re making custom logo patches for uniforms, sew-on or heat seal is usually the safe lane. If you’re doing removable patches, hook-and-loop is the move.
Bulk Custom Patches: What Changes When You Scale Up
Ordering 25 patches is one thing. Ordering 1,000 is a different game.
When you move into bulk custom patches, you need to lock:
- Exact colours (Pantone or close match expectations)
- Final size and shape
- Final backing choice
- Placement guidelines if multiple teams are applying them
If you don’t lock those, every reorder turns into a new argument about “why does this batch look different?”
The smart way to scale
- Approve a proof carefully
- Order a small run first if the design is new
- Then go bigger once you’ve seen a real sample
That is how you avoid burning money on a “perfect on screen, weird in real life” surprise.
Pricing Factors: What Actually Moves the Cost
People love to ask “How much per patch?” without giving details. Price moves based on a few real levers:
- Size: bigger patches cost more, period
- Complexity: more stitching time, more cost
- Borders: specialty cuts can add cost
- Backing: hook-and-loop and certain adhesives can add cost
- Quantity: higher quantity drops the per-unit price
- Timeline: rush orders can cost extra depending on vendor capacity
If you’re trying to hit a budget, don’t just shrink the size. Sometimes simplifying the art saves more than going from 3.5 inches to 3 inches.
Lead Times: What’s Normal and What’s Risky
Here’s the honest version: timelines depend on patch type, complexity, and proof speed.
Typical workflow looks like:
- Quote and artwork review
- Proof approval
- Production
- Shipping
You control one big variable: how fast you approve proofs. If you need patches by a hard date, don’t let the proof sit for three days.
How To Vet a Patch Manufacturer Without Getting Fancy
You don’t need a detective mission. Just ask practical questions:
- Can you show examples of similar patch types and sizes?
- What happens if the proof looks good but the real patch comes out off?
- How do you handle colour matching?
- What backing do you recommend for my use case and why?
A real patch manufacturer answers those quickly and clearly. A sketchy one dodges or talks in circles.
Picking the Right Patch Style:
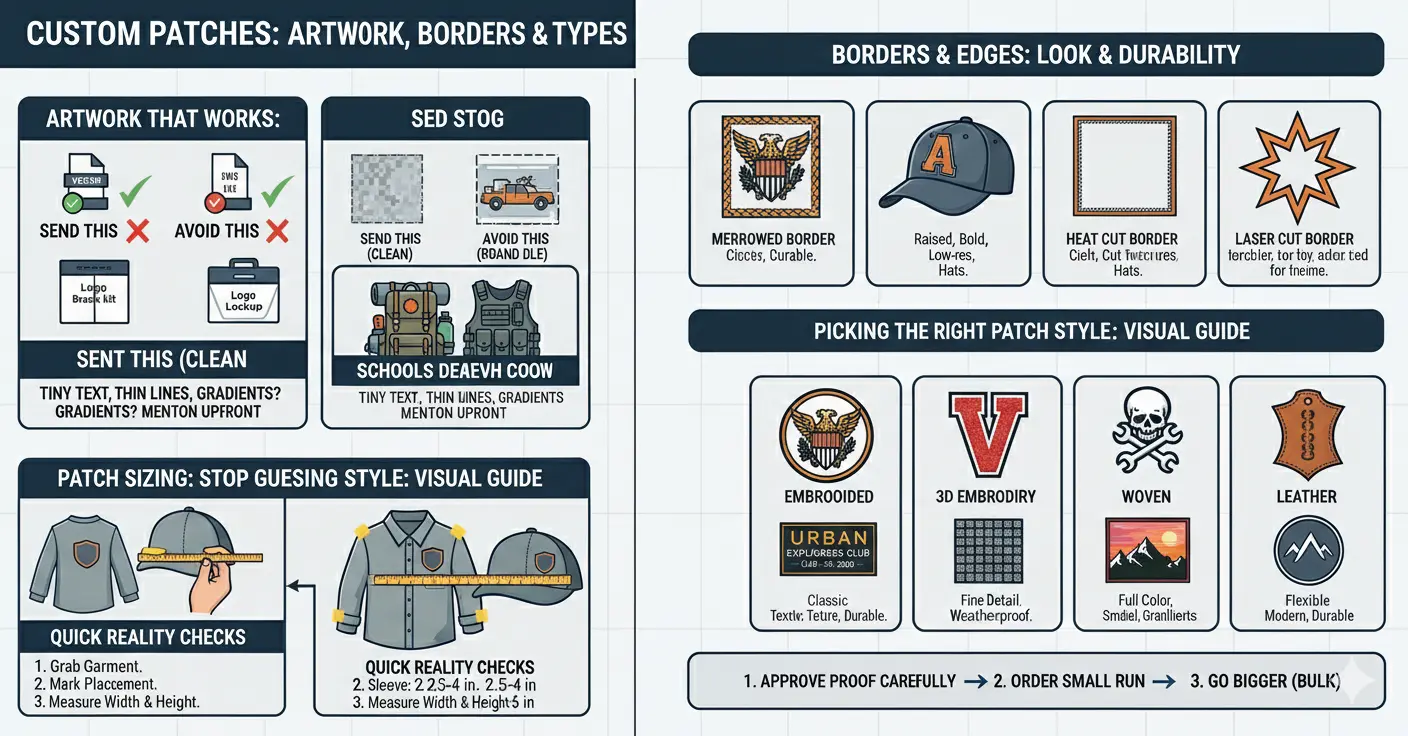
Custom Embroidered Patches: The Classic That Still Wins Most Orders
Custom Embroidered Patches are the default for a reason. They’re durable, they have that stitched texture people associate with uniforms and heritage, and they make basic logos look “official” instantly.
Not sure whether standard embroidery or 3D raised stitching fits your brand better? See our side-by-side comparison of 3D embroidery vs regular embroidery before finalizing your artwork.
Where embroidered wins
- Uniforms, work shirts, jackets, and outerwear
- Clubs, schools, scouting, teams, and local orgs
- Bold logos with clean shapes and readable text
- Patches that need to feel traditional and sturdy
Where embroidered can backfire
- Small text, thin lines, and detailed logos at tiny sizes
- Designs that rely on gradients or photo-like detail
- Artwork with lots of colour changes packed into a small patch
Custom 3D Embroidery Patches: The Raised Look Made for Hats and Bold Lettering
Custom 3D Embroidery Patches are all about depth. They give you that raised, “puffy” look that stands out on caps and structured gear. If your design is simple and bold, 3D embroidery can make it look high-end fast.
If you’re new to raised stitching and want a deeper breakdown of how it works, materials used, and when brands choose it, read our full guide on what 3D embroidered patches are and how they’re made
Where 3D embroidery wins
- Hat fronts, beanies, and structured caps
- Big lettering, initials, numbers, and simple icons
- Streetwear drops where texture is part of the brand
- Logos that need to look “thicker” without going bigger
Where 3D embroidery can backfire
- Fine detail, small text, and thin line art
- Busy logos with lots of internal elements
- Designs that depend on perfect sharp corners
If you’re looking for the best use cases for puff embroidery, these four are the safest bets because the fabric supports the height and the design stays readable.
Real-world tip:
Keep the 3D part for the big shapes and do flat embroidery for outlines or smaller details. That combo keeps it readable and still gives you the pop.
Custom Chenille Patches: The “Varsity Jacket” Look That Sells Itself
Custom Chenille Patches are loud in a good way. They’re plush, raised, and feel premium without trying too hard. If your goal is instant visibility, chenille is a cheat code.
Where chenille wins
- Letterman jackets, hoodies, and heavy fleece
- Teams, schools, clubs, and alumni drops
- Streetwear where texture is the whole point
Where chenille can backfire
- Tiny text, thin line art, detailed logos
- Lightweight tees or flimsy fabric that can’t support the weight
- Designs that rely on gradients or fine shading
Real-world tip:
If the logo is detailed, do a hybrid. Chenille for the big shapes, embroidery for outlines or small text. That combo looks expensive and stays readable.
Custom Leather Patches: Quiet Branding That Looks Expensive
Custom Leather Patches are for brands that want the “clean and premium” vibe. No loud colour, no glossy shine. Just a mark that looks like it belongs on denim, workwear, or hats.
Best use cases
- Denim jackets and jeans
- Beanies and caps
- Bags, aprons, and outdoor gear
- Minimalist brand logos
Design rules that keep leather from looking cheap
- Keep line thickness strong. Hairline details disappear.
- Avoid tiny text. If you need text, make it big or skip it.
- Choose contrast intentionally. Debossed marks can get subtle fast.’
Budget reality: Leather patches often land higher than basic embroidered patches, especially if you need special finishes. Worth it when your product is already priced like a premium item.
Custom PVC Patches: Built for Rain, Sweat, and “This Gets Beat Up”
Custom PVC Patches are the pick when durability matters more than thread texture. PVC holds up in wet conditions and heavy wear scenarios. It also gives you crisp edges and a modern look.
Where PVC wins
- Outdoor brands and workwear
- Tactical, security, and training gear
- Bags, backpacks, and equipment cases
- Anything that sees water, sun, abrasion
Where PVC is the wrong move
- Classic heritage looks where embroidery is expected
- Ultra formal uniforms where the patch should look traditional
- Designs that need a soft, fabric feel
Common mistake: People choose PVC for a detailed logo with tiny text, then cram everything into a 2-inch patch. PVC can hold detail, but size still matters. If the design is dense, go bigger or simplify.
Custom Woven Patches: The Detail-Saver for Small Text and Crisp Logos
Custom Woven Patches are what you choose when you need clarity more than texture. The thread is finer than embroidery, so you can pull off small lettering and detailed shapes without everything blending together.
Where woven wins
- Small text, thin outlines, and detailed logos
- Clean brand marks where sharp edges matter
- Uniforms and merch that need detail at smaller sizes
- Designs that embroidery would “soften” too much
Where woven can backfire
- When you want raised, chunky stitch texture
- When the design is huge and meant to feel heavy
- When the patch is going on extreme-abuse gear where PVC/silicone is better
Real-world tip:
If readability is the goal, woven is usually the safest choice. It’s the patch style people wish they picked after they see their tiny embroidered text turn into spaghetti.
Custom Applique Patches: Big Shapes Without Crazy Stitch Costs
Custom Applique Patches work when you want large blocks of colour and clean shapes without paying for heavy stitch coverage everywhere. Applique uses layered fabric pieces stitched down, so you get a bold look that’s efficient.
Great for
- Big letters, numbers, and clean icons
- Jackets, hoodies, uniforms
- Club patches with strong shapes
Watch out for
- Small internal details
- Too many fabric layers on thin garments
- Designs with lots of tiny colour changes
Applique is one of those “looks like more work than it is” options. If you need impact on a bigger patch, it’s worth considering.
Custom Sequin Patches: When You Want Flash, Not Subtlety
Custom Sequin Patches are not trying to be serious. They are built for stage outfits, dance teams, cheer, fashion capsules, and anything meant to catch light.
They work best when
- The design is simple and bold
- You want shimmer as the main feature
- The garment will be worn for events, not daily workwear
They can fail when
- You expect heavy washing and constant abrasion
- The design relies on fine lines or tiny text
If you’re using sequins, you’re picking a vibe. Just don’t pretend it’s a “rugged” patch type.
Custom Sublimated Patches: Full-Colour Art Without the Stitch Headache
Custom Sublimated Patches are the pick when your design has a lot going on and you don’t want to “translate it into thread.” Sublimation is about colour accuracy and smooth gradients. Think artwork, illustrations, shaded logos, or anything that would turn into a blurry mess if you tried to embroider it at small sizes.
Where sublimated wins
- Designs with gradients, shading, or lots of colours
- Artwork-style logos and illustrated mascots
- Event patches where you want the design to pop fast
- Small runs where you need the look to match the digital art closely
Where sublimated can backfire
- When you want heavy texture or raised thread
- When the design needs a traditional, stitched feel
- When the patch will take constant abrasion on rough gear
Real-world tip:
Sublimation looks best when the border is planned properly. Don’t leave the edge decision till the end. A clean border and a readable layout make sublimated patches look premium instead of “printed sticker on fabric.”
Custom Silicone Patches: Clean, Modern, and Built for Abuse
Custom Silicone Patches sit in that sweet spot between fabric patches and molded PVC. They’re flexible, modern-looking, and handle wear and weather better than most people expect. If your patch is going on outdoor gear, uniforms that see rough use, or anything that deals with water, silicone is a strong play.
Where silicone wins
- Outdoor, fitness, and workwear brands
- Bags, backpacks, and gear that gets tossed around
- Tactical and security use cases where durability matters
- Clean, modern logos that look good in a molded finish
Where silicone can backfire
- Traditional uniform looks where embroidery is expected
- Super detailed logos that rely on tiny text
- Projects where you want a soft fabric feel, not a rubber finish
Real-world tip:
Silicone shines when the design is simplified. Thick lines, bold shapes, and clean spacing look premium. Over-detailed silicone patches start looking crowded fast.
Custom Bullion Patches: The Most “Old Money” Patch Style
Custom Bullion Patches use metallic threads and a hand-crafted look that screams tradition. Think golf clubs, military style crests, formal blazers, high-end societies, and premium awards.
Best use cases
- Blazer crests
- Club and lodge emblems
- Ceremonial uniforms
- Premium brand marks where “heritage” matters
Tradeoffs
- Higher cost
- Longer production time
- Not for small budgets or last-minute deadlines
Bullion looks incredible when it fits the brand. If you’re doing a budget merch run, it’s probably overkill.
Specialty Patch Picker!
| Patch Type | If You Want This Look | If You Need This Performance |
| Custom Embroidered Patches | Classic stitched texture, official uniform vibe | Strong durability, great for daily wear |
| Custom 3D Embroidery Patches | Raised, bold, premium hat lettering | High visibility, holds shape on structured gear |
| Custom Woven Patches | Crisp detail, small text that stays readable | Clean lines, consistent results at smaller sizes |
| Custom Sublimated Patches | Full-colour art, gradients, illustration-style designs | Accurate colour and smooth visuals on fabric patches |
| Custom Chenille Patches | Varsity, plush, bold texture | Great on heavy garments, strong visual impact |
| Custom Leather Patches | Minimal, premium, heritage branding | Solid durability, refined look on hats and denim |
| Custom PVC Patches | Modern, crisp molded look | High durability in wet and rough use |
| Custom Silicone Patches | Clean rubber finish, modern branding | Flexible, durable, good for outdoor and heavy wear |
| Custom Applique Patches | Big shapes, layered fabric look | Efficient for large designs without heavy stitch cost |
| Custom Sequin Patches | Sparkle, stage-ready flash | Best for events and fashion, not heavy washing |
| Custom Bullion Patches | Traditional, formal crest look | Premium finish, slower production and higher cost |
Custom Sew On Patches vs Custom Iron Patches: The Decision That Saves Headaches
This is where people either look smart or end up re-ordering.
Custom Sew On Patches: The “No Surprises” Option
If the item is washed a lot, worn hard, or expected to last, Custom Sew On Patches are the safe bet.
Sew-on is ideal for
- Work uniforms and industrial laundering
- Jackets, heavy garments, backpacks
- Anything you do not want peeling or lifting
- Programs that do seasonal reorders and need consistency
The real downside
- Someone has to sew them on. Time and labour are real costs.
If you’re doing 200 staff shirts and paying someone to stitch each one, sew-on can become an expensive choice even if the patch itself is affordable.
Custom Iron Patches: Fast Application, Clean Placement
If you need speed and uniform placement at scale, Custom Iron Patches make sense. Heat seal can look clean and professional when used correctly.
Iron-on is ideal for
- Merch drops
- Events and giveaways
- Teams applying patches quickly before a tournament
- Hats and garments where stitching would look messy
The real downside
- Fabric and heat tolerance matter. Some synthetics hate heat.
- If the patch gets abused or washed aggressively, edges can lift over time.
Smart move: For high-wear items, use iron-on to place it, then add a quick stitch around the border. That combo is rock solid and still faster than full manual placement from scratch.
Attachment Cheatsheet: Pick Based on Use, Not Preference
Use this like a practical filter:
- Daily wash-heavy uniform: Sew-on or heat seal plus stitch
- Fashion merch and moderate wear: Heat seal / iron-on
- Removable patches and name tags: Hook-and-loop
- Short-term event use: Adhesive, only if you accept it may not last
- Thick gear with heavy use: Sew-on or hook-and-loop on a panel
If a vendor asks “What backing do you want?” and you are not sure, give them the use case. A solid patch manufacturer will recommend the backing instead of guessing.
Ordering From Scratch Without Wasting Money
Here’s the clean path that keeps rework low.
Step 1: Define what success looks like
Not “a cool patch.” Say what it must do:
- Must survive weekly washes
- Must look premium on hats
- Must be removable
- Must be ready by a hard date
Step 2: Lock placement and size first
Measure the space on the garment. Commit to width. Most patch mistakes start here.
Step 3: Choose patch type based on artwork
- Thread texture and tradition: Custom Embroidered Patches
- Raised hat lettering: Custom 3D Embroidery Patches
- Small text and fine detail: Custom Woven Patches
- Full colour art: Custom Printed Patches or Custom Sublimated Patches
- Rugged use: Custom PVC Patches
- Premium minimal branding: Custom Leather Patches
Step 4: Approve proof like you mean it
Do not skim. Check:
- Spelling
- Border thickness
- Text legibility at actual size
- Colour expectations
- Backing alignment
If you are ordering bulk custom patches, proof approval is the moment that protects your budget. Treat it like a contract.
Step 5: Decide whether you need a physical sample
If the patch is for a big drop, uniforms, or a new design you’ll reorder, a sample is usually worth it. If it’s a one-time event and you need speed, a proof plus solid vendor track record can be enough.
Quality Checks When the Box Arrives
Open the box and check these before you distribute anything:
- Count: Are all pieces there?
- Size: Spot-check with a ruler. Minor variation is normal, big swings are not.
- Edges: No fraying, no uneven cuts, no warped borders.
- Stitching or print clarity: Text readable, lines not filled in.
- Backing: Centered, clean, not peeling. Hook-and-loop should match sizes.
- Colour: Compare against your approved proof or brand reference.
- Consistency: Pull 10 patches from different spots in the box. They should match.
If something’s off, take clear photos immediately. Good vendors fix issues faster when you show specifics, not vibes.
Care Tips That Prevent Customer Complaints
- Sew-on patches: Turn garment inside out for wash. Avoid high heat drying when possible.
- Iron-on patches: Follow application instructions carefully. Under-pressing is the fastest way to get edge lift.
- PVC and leather: Avoid harsh chemicals and very high heat. These materials are tough, but you can still ruin them with aggressive care.
If the patch is going on something that gets industrial laundering, tell the vendor. That single detail changes the recommendation.
Frequently Asked Questions
Ready To Make a Patch People Actually Wear?
If you’re ordering patches for uniforms, merch, or a brand drop, the fastest way to get it right is to start with three things: where it’s going, how it needs to attach, and what the patch has to survive (washing, weather, daily abuse, or all three). From there, picking the right patch type is easy, and your proof review becomes quick instead of stressful.
If you want help choosing the best patch style for your logo, send the design and tell us the placement and quantity. The Prime Emblem team will recommend the right material and backing, then get you a proof you can approve with confidence. Get a quote, lock the look, and let’s get your patches into production.
