That’s why custom 3D embroidery patches show up everywhere from structured caps and streetwear to team gear and branded uniforms. They’re not for every design, though. If you pick the wrong artwork, 3D embroidery can turn into a puffy blob. Pick the right artwork and it looks like it belongs on the product.
What “3D Embroidery” Actually Means
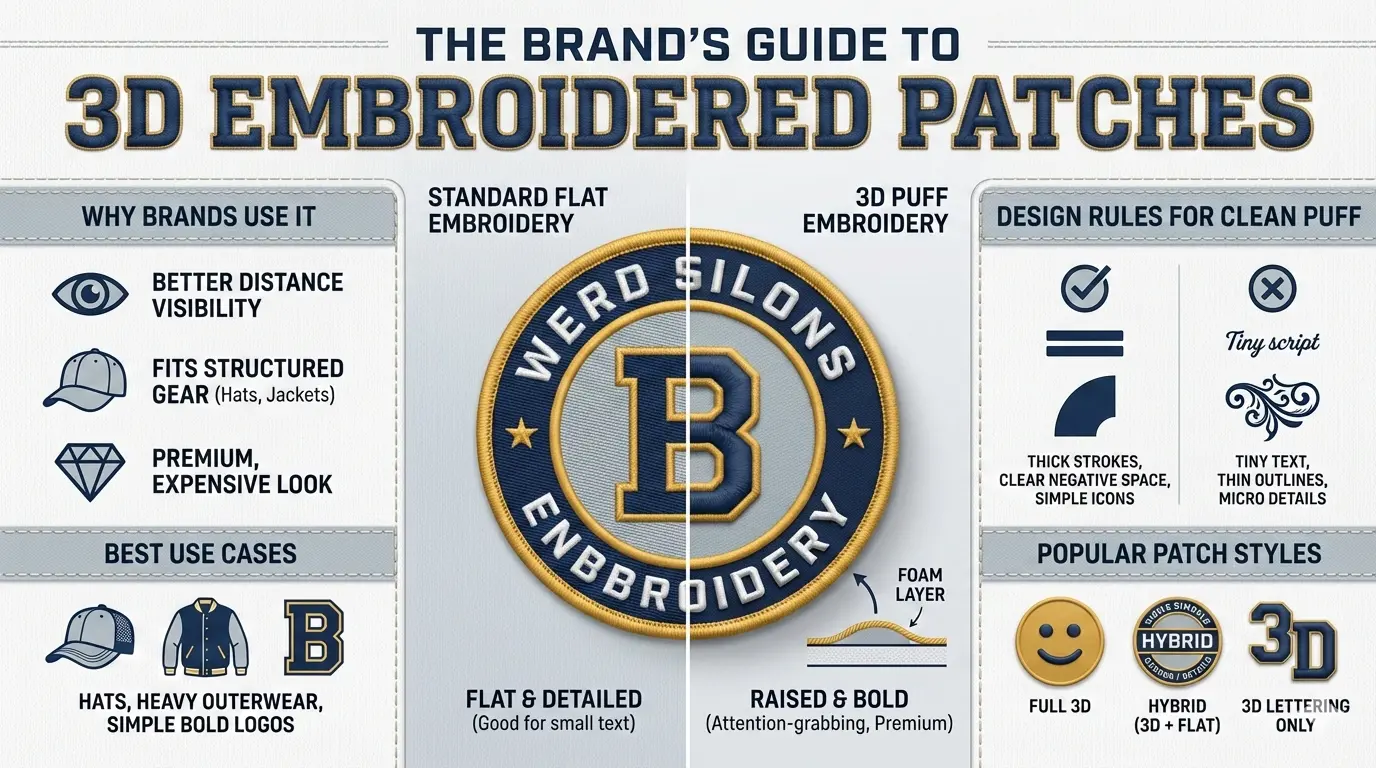
Most 3D embroidery is “puff embroidery.” That means a foam layer is placed under the stitches. The machine stitches over it, the foam gets compressed and trimmed, and the result is a raised, sculpted look.
You’ll also hear terms like:
- 3D puff embroidery patches
- Raised embroidery patches
- Foam embroidery
- 3D embroidered logo patches
Same idea. Height and structure.
3D Embroidery vs Standard Embroidery
Standard embroidery sits flatter. It’s great for detail, outlines, and smaller text. 3D puff is thicker and louder, but it needs simpler shapes to stay clean.
If your logo has tiny text, thin strokes, or lots of interior detail, 3D puff is usually the wrong tool. Use flat embroidery or woven for the detail, and reserve the 3D for the bold parts.
Why Brands Use 3D Embroidered Patches
Most people pick 3D style from a custom patch maker for one of these reasons:
- It looks expensive without changing the logo. Same artwork, stronger presence.
- It reads better from a distance. Raised lettering is easy to spot on hats and jackets.
- It fits structured items. Caps, heavy hoodies, and outerwear handle the thickness better.
- It’s a streetwear staple. That puffed logo vibe sells, especially on headwear.
If you’re building a “signature” look for hats, 3D embroidery is one of the quickest ways to get there.
The Best Use Cases
3D embroidery is not a “do it everywhere” style. It shines in specific placements.
Where it works best
- Hats: Trucker hats, snapbacks, fitted caps, beanies with structured cuffs
- Heavy garments: Jackets, varsity gear, thick hoodies
- Simple logos: Initials, badges, bold text, clean icons
- Team and club gear: Big letters and clean marks that need to stand out
Where it’s risky
- Thin shirts: The puff can look awkward and feel heavy
- Tiny patch sizes: You lose legibility fast
- Highly detailed logos: Lines collapse, counters fill in, text turns fuzzy
Design Rules That Keep 3D Puff Looking Sharp
If you want custom 3D embroidery patches to come out clean, treat it like a design system, not a random upgrade.
Use bold shapes
- Thick strokes
- Clear negative space
- Simple icons
Avoid these
- Tiny text
- Thin outlines
- Micro details inside letters (especially small counters like in A, R, B)
Keep your wording short
If you’re putting a full company name on a hat patch, 3D puff is usually the wrong approach. Use 3D for the main mark and keep the small text flat.
Pick the right size
3D needs room. If the logo is dense, go bigger or simplify. Trying to squeeze a detailed logo into a small patch is how you get the “puffed blob” problem.
How 3D Embroidered Patches Are Made
You don’t need to be a production nerd to understand the basics. Here’s what matters:
- Digitising for puff
Puff needs a specific stitch strategy. Good puff digitising controls density and direction so the foam sits evenly. - Foam placement
The foam is placed where the raised areas should be. Not everything needs foam. - Stitching over foam
Satin stitches usually cover foam best. That’s why 3D looks clean on bold letters. - Trim and clean-up
Excess foam gets trimmed away. Clean edges depend on the digitising and stitch coverage.
If the digitising is weak, the puff will look lumpy or uneven. If the digitising is strong, the patch looks crisp and intentional.
3D Patch Styles People Actually Order
Most real orders fall into one of these setups:
- Full 3D: The whole logo is puffed. Works when the logo is super simple.
- Hybrid 3D + Flat: Puff for the main text, flat embroidery for outlines or small details.
- 3D Lettering Only: Big initials or a short brand name on a hat. Clean and popular.
Hybrid is the safest bet for most brands. You get the “wow” effect without sacrificing clarity.
Don’t Guess on Patch Type: Compare Before You Lock It In
If you’re still deciding between 3D embroidery, woven, PVC, chenille, leather, sublimated, and different backings, use this: Custom Patches Breakdown: Types, Backings, Borders & More!
It helps you pick the right patch style based on your logo and where it’s going, not based on hype.
FAQs
Get The Raised Look The Right Way
The biggest mistake with 3D embroidered patches is forcing it onto the wrong logo. Keep it bold, give it room, and go hybrid when the design needs detail. Do that and you get the raised look people actually notice.
Ready to order? Send your logo, patch size, and deadline and ask for a 3D embroidery proof. Once you approve it, the skilled team of Prime Emblem can start production and you will know exactly what is arriving.
