The border is the first thing people notice on custom embroidered patches. Not the thread colour. Not the logo detail. The edge. Pick the wrong edge finish and even a great design can look off. Pick the right one and the patch looks crisp, “official,” and built to last.
Let’s see further!
What an Embroidered Patch Maker Should Ask Before Picking a Border
A solid embroidered patch maker won’t ask “merrow or laser cut?” like it’s a vibe question. They’ll ask what the patch is going on and how it’s getting used.
Answer these and the choice usually makes itself:
- Is the patch a clean circle, shield, or rectangle, or is it a weird custom shape
- Does the design have tiny corners, sharp points, or thin “spikes”
- Is this going on uniforms that get washed a lot
- Are you doing 25 pieces for a drop, or 2,500 for staff uniforms
- Do you care more about a classic raised border, or a sharp modern outline
If you want a bigger picture view on backings and finishes across different patch types, one must know about the custom patches breakdown decisions.
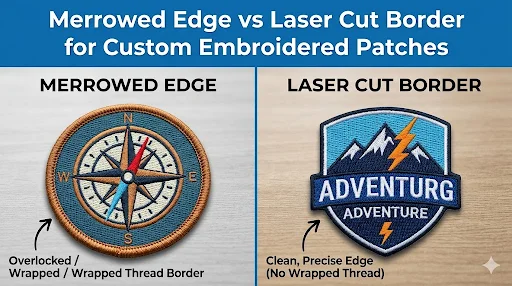
Merrowed Edge Explained
A merrowed edge is the classic stitched border you see on traditional patches. It’s slightly raised, rounded, and gives the patch a bold outline.
Where merrowed borders shine
- Clean shapes like circles, ovals, shields, rectangles
- Larger patches where the border has room to sit nicely
- Uniform patches that need that “official” look
- Jackets, workwear, club patches, scout-style patches
Why people still love merrow
- It frames the patch and hides small edge imperfections
- It’s durable and holds up well over time
- It gives the patch a thicker, more “finished” feel
Where merrow can work against you
- Sharp corners and tight curves get rounded
- Detailed custom shapes can look softer than you expected
- Very small patches can end up with a border that eats into the design
Real talk:
if your embroidered patch shape looks like a gear, a lightning bolt, or a jagged mascot outline, merrow can make it look less sharp. Not “bad,” just less crisp.
Laser Cut Border Explained
Laser cut borders (often grouped with hot cut styles) are about precision. The patch edge is cut cleanly without that thick stitched border.
Where laser cut borders shine
- Custom shapes with sharp corners or complex outlines
- Designs with fine detail near the edge
- Smaller patches where you don’t want the border taking up space
- Modern branding where a clean silhouette matters
Why people pick laser cut
- The outline stays sharp
- The patch can follow the exact shape of your logo
- You can keep more usable space for the actual design
Where laser cut needs caution
- If the edge is not finished cleanly, fraying can be a risk on some patch types
- Super thin points can still bend or curl depending on the backing and placement
- It can look “too clean” if you want that classic badge feel
If you’re doing detailed embroidered patches for businesses and the logo has small elements close to the border, laser cut can help keep it readable without crowding.
Merrowed Edge vs Laser Cut Border in Real Scenarios
Here’s the practical way to choose without overthinking it.
Pick merrow when you want
- A traditional patch look
- A thicker border that frames the design
- A patch that will be handled a lot and needs a tough finish
- Simple shapes that suit rounded edges
Example: a circular company logo patch for uniforms, or a school badge for jackets. Merrow is the safe lane.
Pick laser cut when you want
- A sharp outline that matches a custom shape
- Maximum space for the design, especially on smaller sizes
- Cleaner edges around tight corners and fine silhouette details
Example: a custom-shaped brand mark for hats or a small chest patch where every millimetre matters.
Border Choice Should Match Your Backing
Borders and backing behave together. A border that looks perfect on a sew-on patch might lift or curl if the backing choice doesn’t fit the garment.
This is also where sew-on vs iron-on embroidered patches comes into play. Iron-on is fast, but if the garment gets heavy washing or the patch has lots of tight corners, edges can lift over time if it wasn’t pressed properly. Sew-on is slower, but it’s the dependable option for uniforms and long-term wear.
If you’re going iron-on and you want fewer edge problems:
- Avoid ultra sharp corners when possible
- Make sure the garment can handle proper heat and pressure
- Consider a quick stitch around the border for long-term hold
Thread and Border Work Together More Than People Think
A border can look clean or messy based on thread choices. If your border is meant to pop, thread sheen and durability matter, which is why best thread types for embroidered patches becomes a real decision, not a nerd detail.
Quick guidance:
- If you want a bold border that holds colour well, go for thread that resists fading and stays tight after washing
- If your logo is subtle and you want the edge to blend, match border thread to the patch base or outline thread
Quick Recap
If you want one rule set to save you time:
- Simple shape + classic patch feel = Merrowed edge
- Custom shape + sharp silhouette = Laser cut border
- Small patch with tight layout = usually Laser cut
- Big uniform badge = usually Merrowed
- Lots of sharp points = lean Laser cut or simplify the outline
Frequently Asked Questions
Pick the Edge That Fits the Job, Then Lock the Proof
If you want that classic badge look, go merrow and keep the shape clean. If you want a sharp silhouette that matches your logo exactly, laser cut is usually the better call.
Want a fast recommendation without guessing? Send your artwork, patch size, and where it’s going on the garment. The Prime Emblem team will tell you straight which border will look cleaner, then get you a proof you can approve with confidence.
