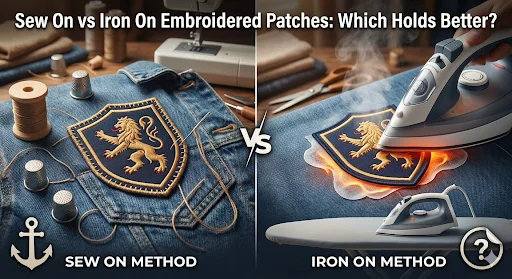
If you’re ordering embroidered patches, the design is only half the decision. The other half is how the patch actually gets on the garment and stays there. That’s what this guide is about: sew-on vs iron-on embroidered patches, when each one makes sense, and the little details that stop your patches from lifting, curling, or falling off after a few washes.
What Are Custom Embroidered Patches
Let’s answer the keyword straight: what are custom embroidered patches?
They’re patches made by stitching thread into a base fabric (twill is common) to create a logo, text, or design. You choose the shape, size, colors, border finish, and backing. They’re popular because they look “official” fast. Uniforms, clubs, teams, streetwear, merch, workwear, all of it.
If you’re still comparing patch types and attachments beyond embroidery, keep this Custom Patches Breakdown guide bookmarked as your base reference for decisions.
Sew-On vs Iron-On for Embroidered Patches
This is the real question people should ask first: how hard is this patch going to get used?
Sew-On embroidered patches
Sew-on means the patch is stitched onto the garment using a sewing machine or by hand. No adhesives, no heat bonding. Just thread.
Sew-on wins when
- The item gets washed a lot
- The garment is thick or textured like jackets, denim, backpacks
- You want the most dependable hold long term
- You’re putting patches on uniforms that go through heavy wear
Where sew-on can be annoying
- It takes time and labor
- If you’re applying hundreds of patches, sewing becomes a cost and a scheduling issue
- Placement consistency depends on whoever is sewing them on
Sew-on is the “no surprises” option. If you’re ordering patches for hard-use uniforms, it’s usually the safest call.
Iron-on embroidered patches
Iron-on patches use a heat-activated adhesive on the back. You place the patch, apply heat and pressure, and the adhesive bonds to the fabric.
Iron-on wins when
- You need fast application
- You’re applying patches consistently across many items
- The garment fabric can handle heat
- It’s merch, events, teams, or short-to-mid-term wear
Where iron-on can fail
- Thin synthetics that don’t like heat
- Frequent hot washing and heavy drying
- High-abrasion areas like backpack straps
- Corners and edges lifting if the patch wasn’t pressed correctly
Iron-on is great when speed matters, but it’s not magic. Heat and pressure have to be done right.
Embroidered Patch Maker Checklist Before You Choose Backing
If you’re working with an embroidered patch maker, these questions make the decision obvious:
- What fabric is the patch going on
- How often will it be washed
- Is it a high-friction area like sleeves or straps
- Are you applying 10 patches or 1,000
- Do you need removability later
If the garment is thick and worn hard, sew-on is usually the smart choice. If the garment is standard cotton and you need fast application, iron-on is usually fine.
The Hybrid Move Most People Ignore
If you want speed but also want long-term hold, do this:
- Apply iron-on first for perfect placement
- Add a quick stitch around the border
This is common for uniforms, jackets, and varsity-style pieces. The iron-on locks the placement. The stitch makes it nearly bulletproof.
If someone asks you which is better, sew-on or iron-on, this hybrid answer is often the real winner.
Fabric Compatibility and Heat Reality
Iron-on works best on:
- Cotton
- Denim
- Canvas
- Heavy blends that can take heat
Iron-on is risky on:
- Polyester blends that melt or shine under heat
- Stretch fabrics
- Waterproof or coated fabrics
When in doubt, test one patch on a spare garment or hidden area. The patch can be perfect and the fabric can still ruin the application.
How to Apply Iron-On Patches Without Edge Lift
Most iron-on failures come from poor technique. Do this instead:
- Preheat the garment area for a few seconds
- Place the patch and cover with a thin cloth
- Press with firm pressure, don’t just “hover”
- Hold the heat long enough for full bonding
- Let it cool fully before moving the garment
If the edges start lifting later, it’s usually because the press was too light, too short, or uneven.
What Else Affects Durability Besides Backing
Backing is huge, but it’s not the only variable.
- Patch size and edge shape can affect lifting
- Very sharp corners lift easier than rounded shapes
- Placement in high-motion areas adds stress
- Wash temperature and dryer heat matter
Also, border choice matters. You’ll often see people debating Merrowed Edge vs Laser Cut Border because the finish affects the final look and edge behavior depending on shape and detail.
Same deal with thread choices. If you’re chasing a specific feel or sheen, best thread types for embroidered patches becomes part of the quality decision, not just a technical detail.
And if you’re ordering uniforms, the use case changes everything. Embroidered patches for businesses usually need predictable hold and easy replacement planning, not just a cool look.
Quick Decision Guide
Pick sew-on patches if:
- It’s workwear or uniforms
- It will be washed hard and often
- It’s going on a jacket, bag, or thick gear
- You want maximum long-term security
Pick iron-on if:
- You need fast application
- It’s cotton or denim
- You need consistent placement across many items
- The patch is for merch, events, or moderate wear
Pick iron-on plus stitch if:
- You want fast placement and long-term durability
- You’re patching heavy garments but want clean alignment
- You don’t want edge lift over time
Frequently Asked Questions
Pick the Backing that Matches Real Life
If you want the safest long-term hold, sew-on is the easy answer. If you need speed and clean placement, iron-on makes sense on the right fabrics. If you want both, go iron-on plus a quick stitch and stop worrying about edge lift.
Want help choosing the right setup, share the garment type, placement, quantity, and how it’ll be used to Prime Emblem team. A good embroidered patch build is not guesswork. It’s matching the patch to the real job.
